


|
While I’m waiting for the humidity to drop so I can prime miniatures to continue with my A Call To War: Clan Coyote Epsilon Galaxy project, I thought I would write up an article for another miniature I recently completed. I am real pleased with how the paint scheme came together for me even if I goofed on assembling the miniature.
Let’s start with the build. I started with the Mad Cat resculpt which is a great miniature. I currently have seven Mad Cats not including the plastic one that came in the Introductory Box Set. None of them are in the prime configuration except the Introductory Box Set one. It is a great miniature to build.
For those who are intimidated by the number of pieces, take a quick look at Cache’s assembly guide. That should help put your mind at ease. The biggest trick to it is to take your time. When I assemble a Mad Cat, it takes at least two evenings. I like to make sure my glue has completely cured before moving to the next major step. I usually do in these groupings: building the legs and add small bits to torso, add legs to hips, glue torso onto the hips, and finally add arms and launchers to torso. I find I am often bending some toes to make a walking or running pose that still keeps one foot solidly on the base and the other foot partially on the base for stability.
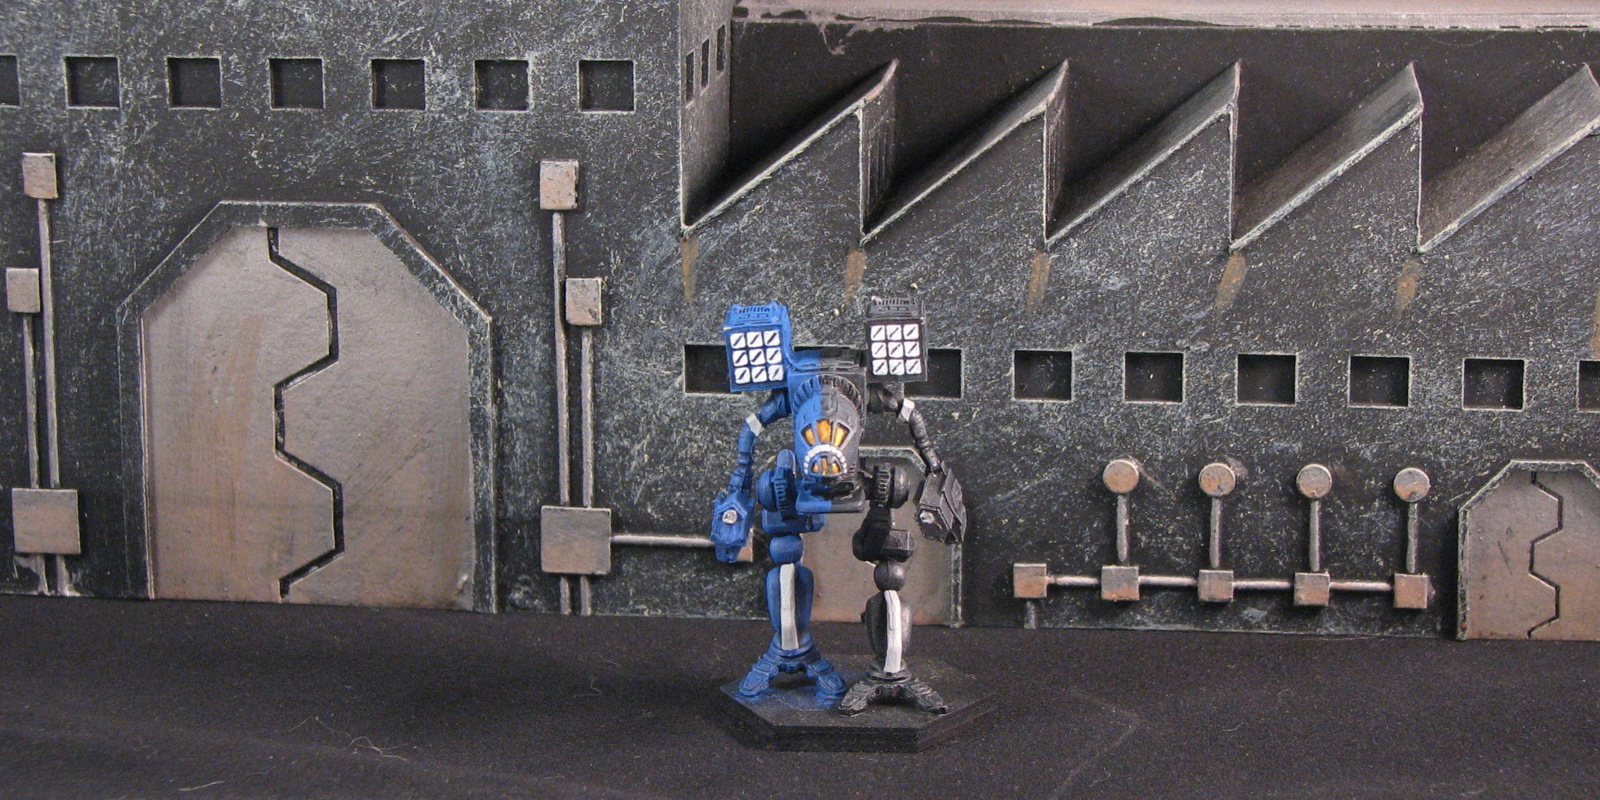
For the E configuration, I needed to get some additional parts. I started with the base resculpted Mad Cat. IWM has left and right arms for Mad Cat E (OP-080 and OP-081). These arms contain just the ER large laser. If you are good with your tools, you should be able to alter the Prime’s arms and remove the medium pulse lasers but I went with the other arms. Lastly, you will need some new missile launchers. The ATM9 launchers that I used were for the Puma E (OP-067). You will need two of these.
One thing to note about the arms: they are not the same style as the regular Mad Cat arms. They have the same attachment style as the Thor and Loki. At least I think they did. I assembled the mini last fall. The other difference between these arms and the Prime’s arms are the lack of a top post. I’ll get to that a little later.
We have all of our pieces, so let’s begin. Assemble the legs and attach to the hips. While that is going on, we need to do some work to the torso. We have a couple of items to do. There are a two attachment points on the torso for the Prime’s torso weapons. Some people leave them alone while others fill them in with green stuff and then file smooth. I’ve done both. I currently have three Mad Cats waiting for primer that I did not fill in. Granted I really didn’t have a need to mix up any green stuff so I did not do it. I suspect I will this week and regret doing it after they are completely assembled but that is another story.
Once you are done (or skipped) that step, we need to start looking at the arms and launchers. The base mini has two small posts that come out to attach the arms. There is also a larger and shallow circular potion that is the post’s base. I took my snips and took some of the small post off. Again I’m only 95% certain that I had to do these steps. If the arms have the traditional Mad Cat attachment, rejoice and move on. You want to make sure the arms fit securely onto the larger, shallower circular post (similar in size to the Thor or Loki arm posts). There is plenty of surface area for the glue to bond the two pieces together. At this point in time, you should only be dry fitting the arms in place.
Next we need to figure out how to attach the launchers. This is tricky. I chose to pin the side of the launcher directly into the torso. Some of my recent Mad Cats were using arms with the post on top and I’ll be honest, that was much easier. Unfortunately, I don’t think I’m good enough to be able to drill down into the arms to install posts so I still drill into the torso for the pin. Placement of the pins is critical. You want the launcher to be sitting just above the arm and have good contact area on the torso.
I fit the arm and launcher into place and then drew a line with a fine marker so I could see where I could work. I did this on both sides. From there, I looked for a nice spot on the torso to drill. I found it was easier to use the arm post you shortened as a front/back guide. I measured from the top to get a consistent location. I dropped a post in place and put a small amount of paint on the end. I then fit the arm and launcher back into place. The launcher does not fit tight against the torso due to the post but the paint left a nice mark for me to use as a guide. I then pulled the pin out as I did not want the paint interfering with the glue. I used new pins in the final assembly. I drilled a hole where the paint was. I then placed my two launchers together by the bottom with the launchers facing the same direction. This allowed me to transfer the hole location to the other launcher. Word of caution: do not use landmarks on the side of the launcher to guide your hole placement. The left side of the launcher may not be the same as the right side. I’m pretty sure that is what caused my Mad Cat A to have slightly misaligned launchers although I may have just goofed.
We now have arms that can be glued in place and launchers that can be glued onto the torso. At this time I would recommend gluing the torso onto the hips and let it sit overnight. We are going to be doing a lot of things to this and you want your glue nice and strong. Glue your arms in place and allow some time for the glue to cure. Your next step will require patience, patience, and more patience.
Now that your arms are secure, dry fit your launchers with the pins one last time. I found one of my arms shifted up slightly and required a couple passes with the file to allow the launcher to clear the arm easily. Don’t worry. You won’t notice it with the launcher in the way if you need to do that. Get some handy tack ready. Apply glue to the pin hole on the torso and the portion of the launcher that will be touching the torso. Drop the pin in either hole and firmly press the launcher against the torso. I was able to push some handy tack into place on the arm to hold the launcher but I still ended up holding the launcher firmly against the torso for a couple of minutes. Before the glue can dry, use a paper towel to clean up any excess glue that squeezed out. I missed this step on the second launcher and it covered over a lot of the nice details that is on top of the Mad Cat. Once you feel the first torso in secure, repeat the process for the other launcher. I waited several hours before I did the second launcher.
Add the mini to a base if you haven’t done so yet. I usually wash my minis before priming. In the case of minis that do not come on a partial base, I wash them before I glue them onto the base since I use wooden bases. If I’m using a plastic base, I wash them after they are glued to the base.
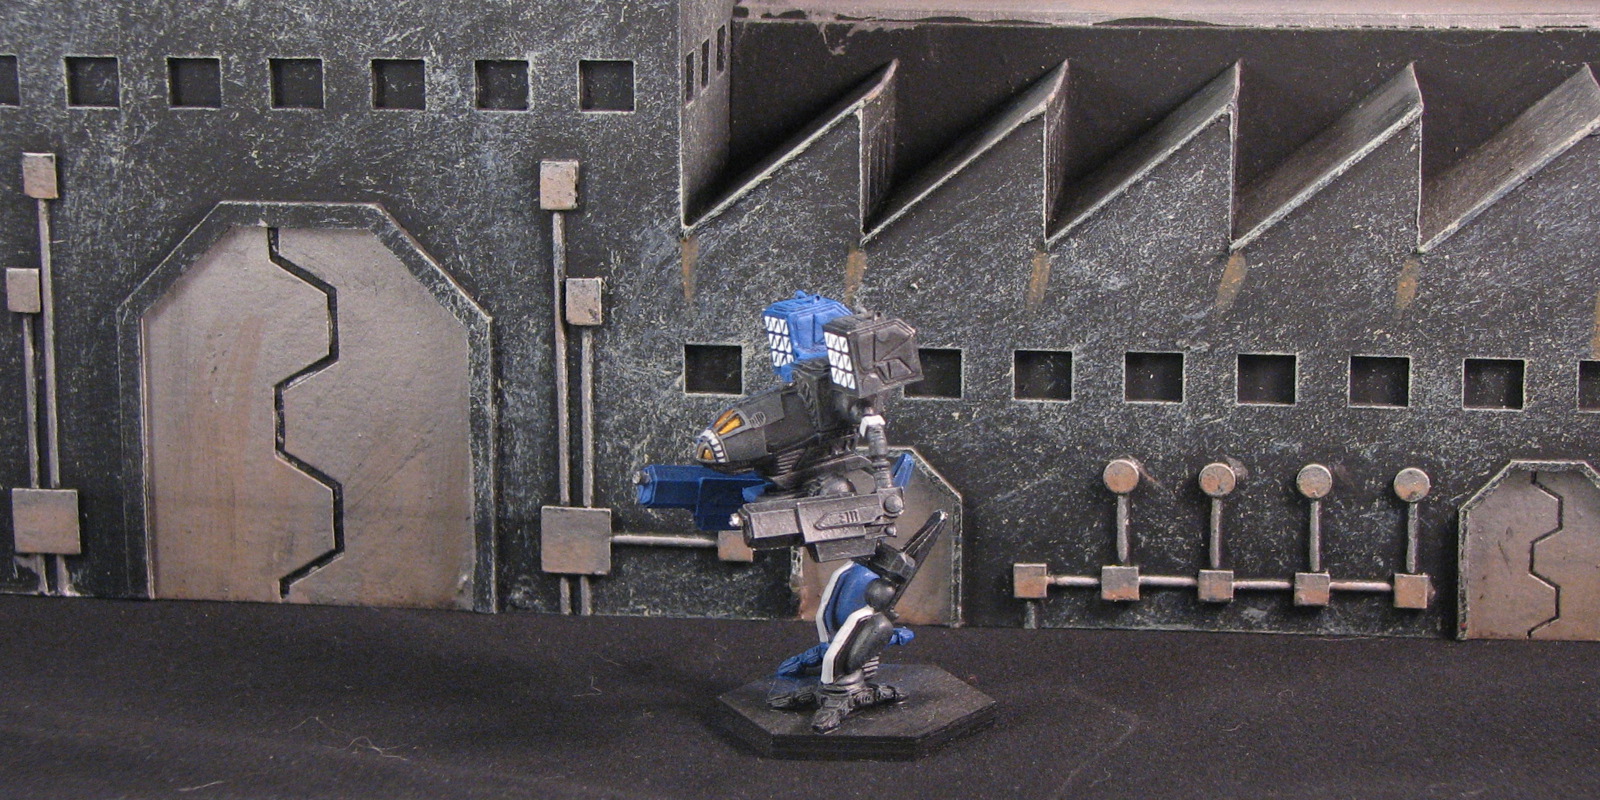
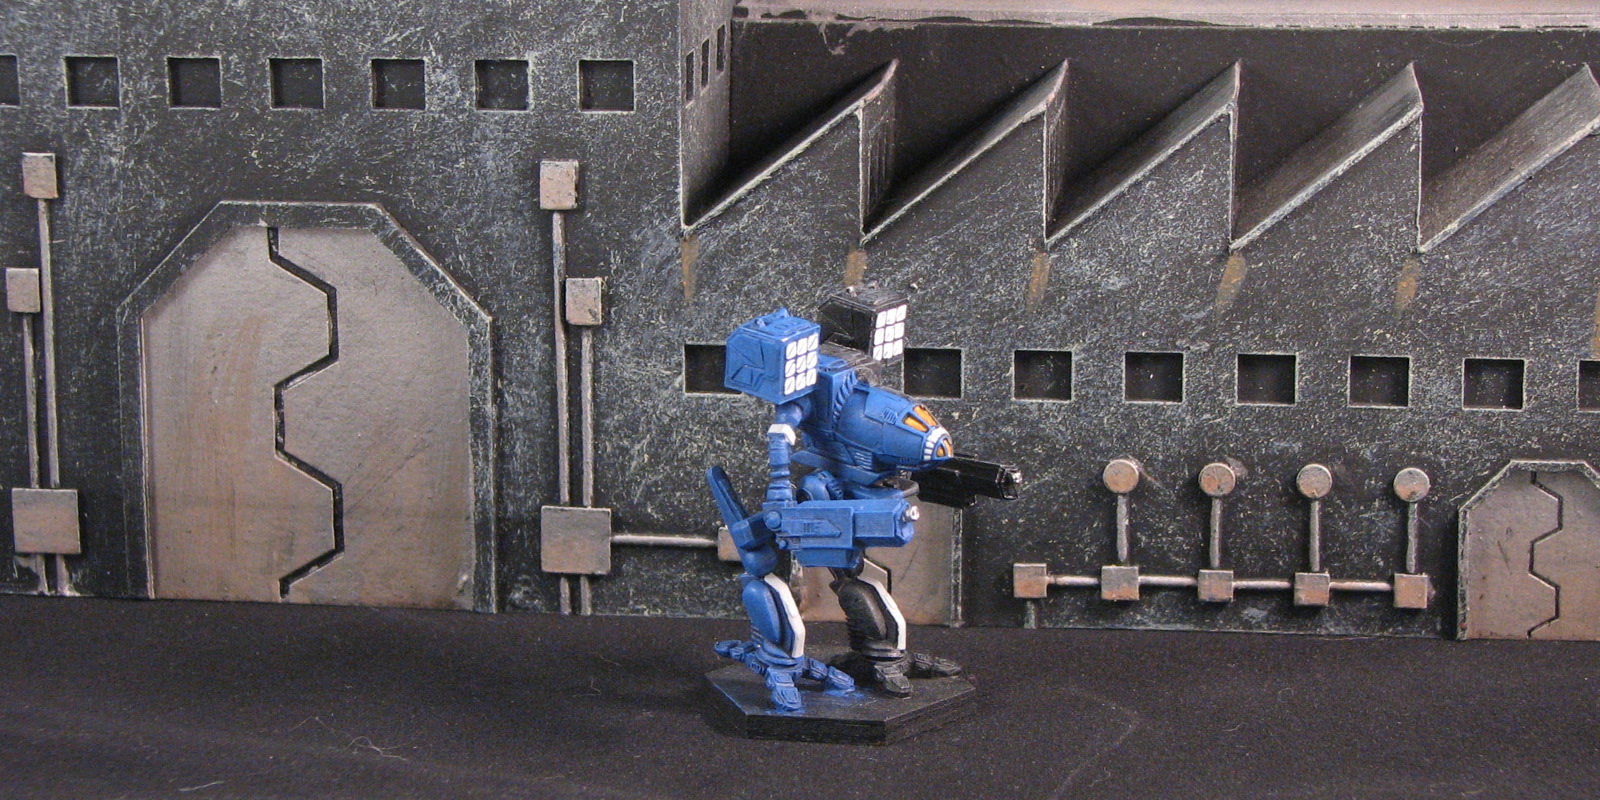
I decided to give my Mad Cat E a nice Clan Coyote paint scheme. They did create that nice ATM technology after all. I decided to do a Coyote paint scheme I had not already tried. I was trying to decide if I should do Lambda or Nu. I have an Uller E that will be done in the other scheme. Nu is pretty straightforward so Lambda is the trickier of the two schemes. Looking at the minis, I came to the conclusion that the Mad Cat would be easier to make the straight line that is critical of the Lambda scheme.
For those not familiar with the Clan Coyote Lambda scheme, it is “Lambda paints their machines in the traditional Coyote colors. The right side of the 'Mech is painted in blue, while the left side is painted black. Light grey highlights unify the scheme.” It was canonized by Savage Coyote. The first step was to prime the mini in black. All paints described will be from Vallejo’s game color line and the washes are from Citadel.
I painted this mini in three distinct phases. The first part was to paint the left side of the mech. I made sure to give the mini a solid layer of Black. Mostly this was to assure that the entire left half of the mini was covered and no bare metal was showing. I next used a 1:1 mixture of Black and Cold Grey and gave the entire left side (and then some) a drybrush of this light black color. As a final step, I gave a very light drybrush of Cold Grey to the upper surfaces and anything that may see direct light from above.
Before I started the second phase, I applied a strip of thin masking tape to the miniature straight down the middle. This didn’t provide a perfect seal due to the uneven surface but could at least help as a guide and reminder. It didn’t do a bad job at keeping paint out from underneath it.
I gave the right side of the mini a solid base coat of a 1:1 mix of Imperial Blue and Ultra Marine Blue. When working around the middle of the mini, I made sure my brush was not heavily loaded with paint and always pulled away from the tape. I then gave it a wash of Drakenhof Nightshade. Again I made sure to pull the wash away from the tape. As a precaution, I allowed the mini to dry on its side so any excess wash material wouldn’t be pulled by gravity under the tape.
After the wash was complete, I did four drybrushing passes across the right side of the mini. Each successive one was lighter than the previous and also targeting a smaller area working my way towards the areas exposed to light. The first was a 1:1 mix of Imperial Blue and Ultra Marine Blue followed by a 1:1:1 mix of Imperial Blue, Ultra Marine Blue, and Magic Blue. The last two layers used only Ultra Marine Blue and Magic Blue in a 2:1 ratio and a 1:1 ratio. Care must be taken to avoid drybrushing over onto the black portions of the mini as these will be very noticeable.
After the last of these drybrushing passes, I removed the tape and was pleasantly surprised that I didn’t have any paint leak underneath. My tape wasn’t dead center but I could live with that. I used Stonewall Grey to highlight some trim to being the two halves together. I only painted thin sections with this light grey so I did not feel I needed to give a second highlighting layer to the trim.
The final two steps were painting the cockpit and painting exposed joints and gun barrels. The cockpit was painted with Glorious Gold and then a Sepia wash was applied over it. On a cockpit like the Mad Cat, this allows the color to be muted towards the canopy edges. I’ve had success with a metallic paint suspended in water and then dropped onto the cockpit area so the metallic paint gradually builds up towards the outer edges. This would be done over an appropriate flat colored paint. Gun barrels and joints are done with Gunmetal Metal and a Nuln Oil wash.
I have not had time to flock the base but you can see the final paint scheme. I hope this was helpful and you can see a new technique to try. I always find it interesting learning how other people paint and incorporating some new skills into my painting style.
|
MechWarrior, BattleMech, 'Mech and AeroTech are registered trademarks of The Topps Company, Inc. All Rights Reserved.
|
||